Windows 7 Magnifier Software for Computer Screen
Microsoft introduced a new Windows 7 Magnifier software named Microsoft Screen Magnifier which is used as a Windows magnifier tool for low vision users of Windows 7 computers. This Windows 7 guide shows how to use new computer screen magnifier, one of Windows 7 tools for users with impaired vision.
 Windows 7 introduced Microsoft Screen Magnifier Windows tool which makes the computer easier to see for you.
Using Windows 7 magnifier software you can zoom in anywhere on the display of your computer, and computer screen magnifier software makes everything in that area larger and easier to see.
Windows users can move Magnifier lens around the screen by moving the mouse pointer, or dock the Magnifier in one place.
It is also easy to customize the Windows Screen Magnifier software like to resize lens size, enabling color inversion, etc.
In order to run Windows 7 Magnifier application, you can follow the Windows 7 Start menu options :
Start > All Programs > Accessories > Ease of Access > Magnifier
Or you can type "magnifier" in the Start menu search textbox.
An other option for new Windows 7 tool is directly executing the "magnify.exe" binary file using the Run command screen.

When you run Microsoft Screen Magnifier, a transparent rectangular area with default 200% magnification setting is displayed on the screen. Windows 7 Magnifier tool displays the area bigger than its normal view. Magnifier screen moves with your mouse movements on the screen display. You can move your mouse to where you want to see in a bigger view with Windows magnifier tool.

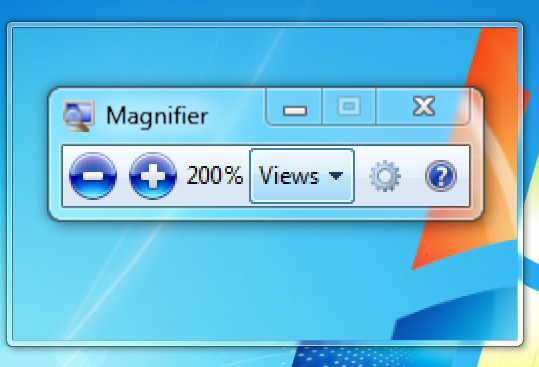
The Windows Screen Magnifier tool is easy to use and easy to customize. The main menu of this Windows 7 tool is as shown in below screenshot.

Windows users can increase magnification power of this Windows 7 tool by pressing the "+" sign. And make smaller the displayed are in the magnifier screen by pressing the "-" sign. The magnification percentage is shown on the Windows Screen Magnifier tool menu.
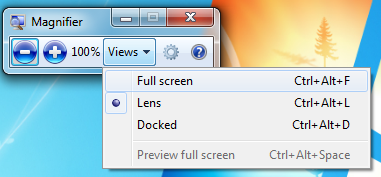
The Views menu option, enables Windows users to use from different magnifier screen areas.
As seen in below screen, available magnifier view options are: Full screen, Lens and Docked options.

Full screen view options turns the whole area of your monitor into a magnifier screen area.
Lens view option magnifies only a certain area around the your mouse pointer on the monitor which is defined with Magnifier Lens Size settings in Options menu.
Docked view option enables the magnifier screen to be displayed on a fixed place on the monitor screen display.
For example, you can fix the magnifier screen or dock the magnifier screen on the left side of your display.
Or you can dock it at the top of the monitor display. The magnified text will be displayed within this Windows tool area.
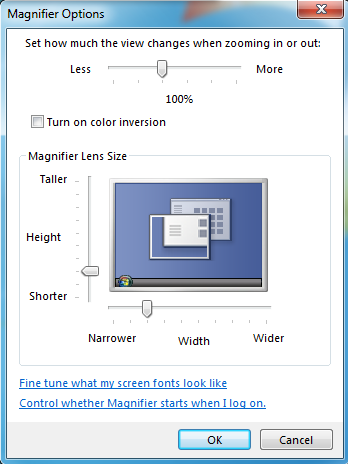
As I said above, it is possible to customize Windows Screen Magnifier software according to your needs by using the configuration settings at Magnifier Options screen.

First magnifier options is:
Set how much the view changes when zooming in or out.
This options sets the magnification power when the user press + sign or - sign in order to change magnification percentage.
For example by default, the magnification is set to 200% and when you press + sign to increase magnification and images/text for bigger view, the magnification ratio is set to 300% (100% percentage increase).
But if you change the magnifier option to maximum value, with a single press at + sign the magnification ratio will change to 500%.
An other option is "Turn on color inversion" which can be activated by marking the checkbox beside the option text. With color inversion option is activated, the Microsoft Screen Magnifier will revert the colors within the magnifier screen. For example white areas in original will be displayed in black. Or just the opposite, black text will be displayed in white color, etc.
It is also possible to configure the magnifier screen dimensions by playing around with the Magnifier Lens Size options. You can see the Height options that can be changed from Shorter to Taller, and Width option from Narrower to Wider. Lens size configuration tool is easy to understand and to configure with visual options.
Windows users can also check the option "Fine tune what my screen fonts look like" which enables you to turn on ClearType fonts for improving the readability of text. Also text fonts can be fine tuned for your view by choosing the best font settings among a number of different font settings.
Last configuration options enables Microsoft Screen Magnifier to start immediately when you log on to Windows 7.
If you click "Control whether Magnifier starts when I log on" link button, the Ease of Access Center control panel screen will be displayed where you can activate Magnifier whenever you log on Windows 7 computer.
Of course if you have already enabled auto run of new computer screen magnifier software, you can also disable Windows Magnifier by clearing the checkbox on the same configuration screen.
For more control over Ease of Access settings, please follow the below Control Panel navigation:
Control Panel > Ease of Access > Ease of Access Center > Make the computer easier to see
