Display Data on Web DynPro Table Element
ABAP Web Dynpro software developers will display data from SAP tables on a Web Dynpro table element in this tutorial part. If you missed the previous parts, you can start from Display Spool Requests using Web DynPro Table for the whole Web Dynpro tutorial.
Up to this point, we have already created SAP Web Dynpro application (component) using SE80 and activate WEb Dynpro components without any error or problem. It is time to create context elements that will store data and can be also used to store data from one Wen Dynpro application page to an other. Besides the data for context nodes and context attributes will be selected from SAP tables, or can also be provided by using ABAP function modules. And the last part of this Web Dynpro will bind data to table elements placed on the page using Layout tab.
Now, open Web Dynpro component using SE80 ABAP Workbench editor. Then double click on Main view and navigate to Context tab. Change your editor mode to Edit (Ctrl+F1) in order to create a node context which will store data that is returned from TSP01 Spool Requests ABAP table for related user. We will also use this context node while data bind process to Web DynPro Table object on the user interface (layout)
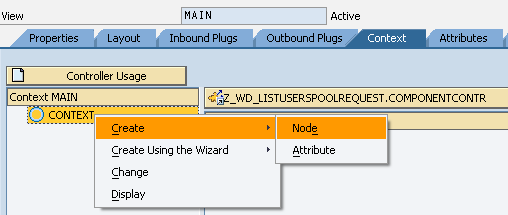
Right click on CONTEXT, choose "Create > Node" menu options
In order to create a new node provide the following data : Node Name and Cardinality
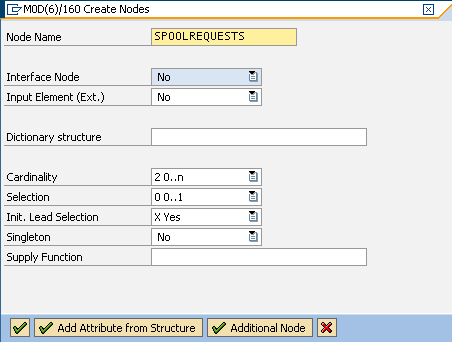
Since we will use this context node to store spool requests for Web Dynpro table object, I change the Cardinality to 0..n
It might happen that there will be no rows as the result of the ABAP SELECT query or many rows might return.
I did not enter a Dictionary structure name like TSP01, because I will add column names (or field names) manually by adding attributes to the context node.
Press Enter when finished
Now we can continue by creating attributes for the new context node

Give the Attribute Name and Type (RQIDENT, RSPOID). You can refer to TSP01 ABAP table using SE11 to get field name and data element name for Spool request number in this case
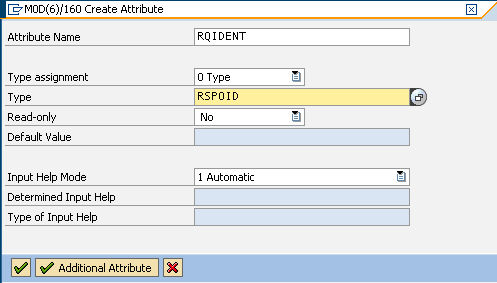
After you add required fields to the context node, activate your Web Dynpro component.
Now we are ready to populate context node with data.
Go to Methods tab of the Main view.
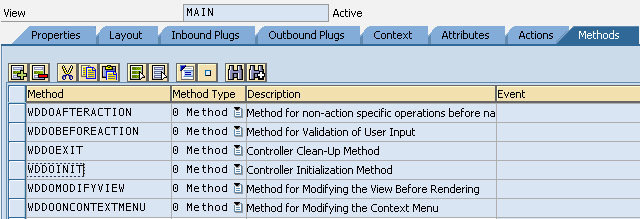
Double click WDDOINIT method which is the Controller Initialization Method
TYPES :

 BEGIN OF gty_TSP01,

  RQIDENT TYPE RSPOID,

  RQ0NAME TYPE RSPO0NAME,

  RQ1NAME TYPE RSPO1NAME,

  RQ2NAME TYPE RSPO2NAME,

  RQOWNER TYPE RSPOUSER,

  RQCRETIME TYPE RSPOCRTIME,

 END OF gty_TSP01.

 DATA :

  ls_TSP01 TYPE gty_TSP01,

  lt_TSP01 TYPE TABLE OF gty_TSP01.


 SELECT

  RQIDENT

  RQ0NAME

  RQ1NAME

  RQ2NAME

  RQOWNER

  RQCRETIME

 INTO TABLE lt_TSP01

 FROM TSP01

 WHERE RQOWNER = syst-UNAME.
Now we have the data for the table. In this step, we will set context node with data we Select from spool requests table.
We can use Web Dynpro Code Wizard (Ctrl+F7) for this task. ![]()
Click Code Wizard icon
Select "Set" option. Mark Table Operation and press icon on the right side of the Node/Attribute entry.
Choose the SpoolRequests node under the Context
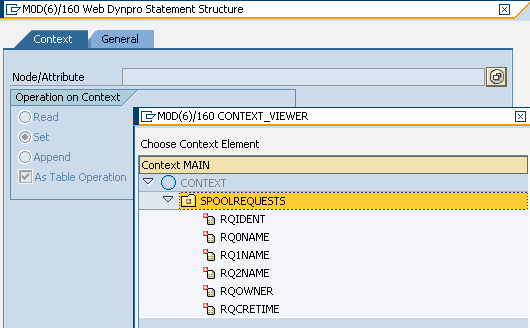
Press Enter twice to return to method code source.
Code wizard added required ABAP code to set context node data
DATA lo_nd_spoolrequests TYPE REF TO if_wd_context_node.


DATA lt_spoolrequests TYPE wd_this->elements_spoolrequests.


* navigate from <CONTEXT> to <SPOOLREQUESTS> via lead selection

lo_nd_spoolrequests = wd_context->get_child_node( name = wd_this->wdctx_spoolrequests ).


* @TODO handle non existant child

* IF lo_nd_spoolrequests IS INITIAL.

* ENDIF.


** @TODO compute values

** e.g. call a model function

*

lo_nd_spoolrequests->bind_table( new_items = lt_spoolrequests set_initial_elements = abap_true ).
Now you can add the following line before bind_table method is called. Here is the modified code.
DATA lo_nd_spoolrequests TYPE REF TO if_wd_context_node.


DATA lt_spoolrequests TYPE wd_this->elements_spoolrequests.


* navigate from <CONTEXT> to <SPOOLREQUESTS> via lead selection

lo_nd_spoolrequests = wd_context->get_child_node( name = wd_this->wdctx_spoolrequests ).


* @TODO handle non existant child

* IF lo_nd_spoolrequests IS INITIAL.

* ENDIF.


** @TODO compute values

** e.g. call a model function

*

lt_spoolrequests = lt_TSP01.


lo_nd_spoolrequests->bind_table( new_items = lt_spoolrequests set_initial_elements = abap_true ).
Now context node is populated with data.
Let's bind this context node data to a Web Dynpro table on the layout tab.
Switch to Layout tab.
On the Layout form, click Code Wizard

double click on Table

Click on Context button
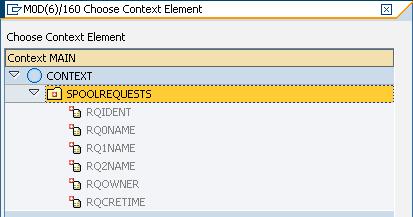
Press Enter icon
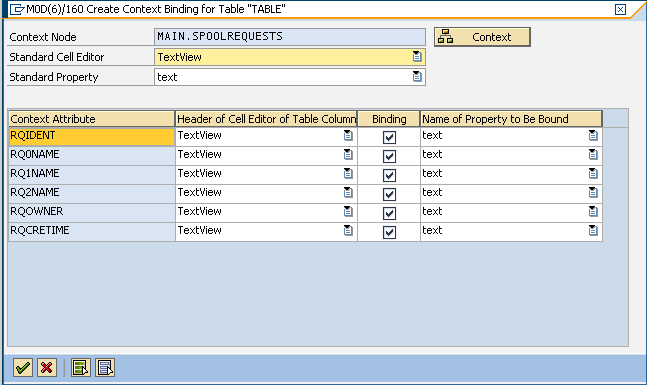
Press Enter icon

When ABAP developers look at the Table element's properties in the properties window, they can see that the dataSource property is automatically filled. The dataSource property is used for databinding relationship between the Table user interface element and the context node element of the Web Dynpro component.
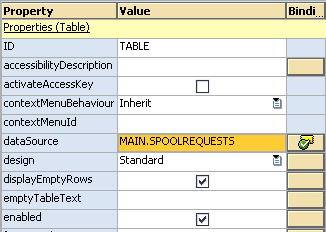
Activate Web Dynpro component codes
Now our sample Web Dynpro application is ready for test. If you wonder how data will be displayed on table element of our sample application of the Web Dynpro tutorial, we can continue with the next step : test Web Dynpro Application.
