SQL Server Import Data using SQL Server Import Export Data Wizard SSIS Package
SQL Server Import and Export Wizard, one of powerful SQL Server tools enables SQL Server import data easily for ETL developers and database administrators.
In this SQL Server tutorial, sql developers will find step by step illustration of how to import data into SQL Server 2008 (or SQL Server 2005) using SQL Server Import Export Data Wizard.
Kodyaz community members will remember SQL Server tutorials SQL Server Export to Excel using SQL Server Import and Export Wizard and Export Data to Excel using SQL Server Integration Services SSIS Package where SQL Server Import and Export Wizard is the main SQL Server tool used managing those data export tasks.
This time we will deal with SQL import data process.
SQL Server Import and Export Wizard 2008 enables step by step sql data import task, save sql import task as an SQL Server Integration Services SSIS package and run ssis package to complete data import into SQL Server database.
What is perfect about saving data import configuration settings as an SSIS package is, SQL Server administrators can create SQL Server job to execute SQL Server import data task periodically based on a schedule.
SQL Server Import and Export Wizard 2008 R2
T-SQL developers and SQL Server database administrators can use Microsoft SQL Server Management Studio (SSMS) SQL Server Import and Export Wizard 2008 R2 in order to import data into SQL database.
To start SQL Server Import Export wizard, open MS SQL Server Management Studio, connect to the SQL Server instance you want to import data into.
Then right click on the sql database name which contains destination table, in the Object Explorer window.
Choose Tasks > Import Data context menu selections.
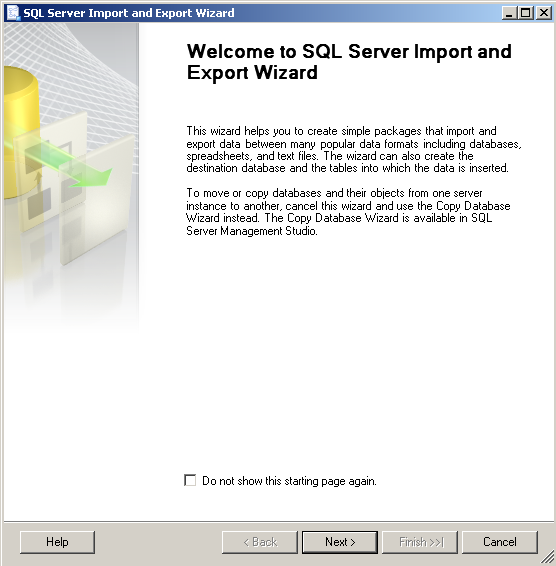
When SQL Server Import and Export Wizard is started which is a very handy SQL Server tool which I strongly suggest sql professionals to use for SQL Server import data task, the following initial screen will be displayed.
SQL developers can continue with next step in the sql import export wizard by pressing Next buton.
Flat File as Data Source for SQL Import Data
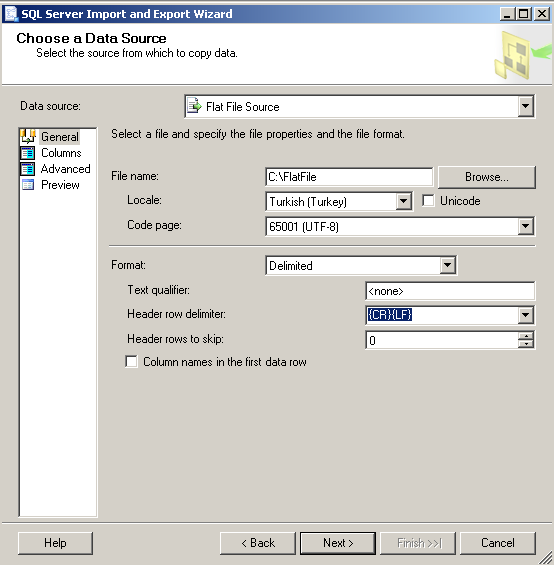
The following import wizard screen enables developers to choose data source type and point to data source file in our sample case.
Choose Data Source type as Flat File :
Choose Flat File Source as the data source of SQL Server import data task
Choose Locale :
Choose Locale carefully. I chosed Turkish (Turkey) from the drop down list.
The Locale is important because it enables SQL Server import and export wizard to know that data is in Turkish and regional settings are set for Turkey.
Code Page :
Code page is the most important parameter in SQL Server import data task.
This gives hint to the sql engine how to read data from flat file while transferring data into sql database.
For files containing Turkish characters, the code page as 65001 (UTF-8) is best option.
Choosing the right combination for locale and code page is the most important step for SQL Server database administrators and tsql developers importing data into sql database.
An incorrect setting will cause the import export data task to fail.
Import error will be especially caused by date / datetime conversions, string conversions, or string data truncated errors.
This is the General tab of the Data Source configuration and settings screen.
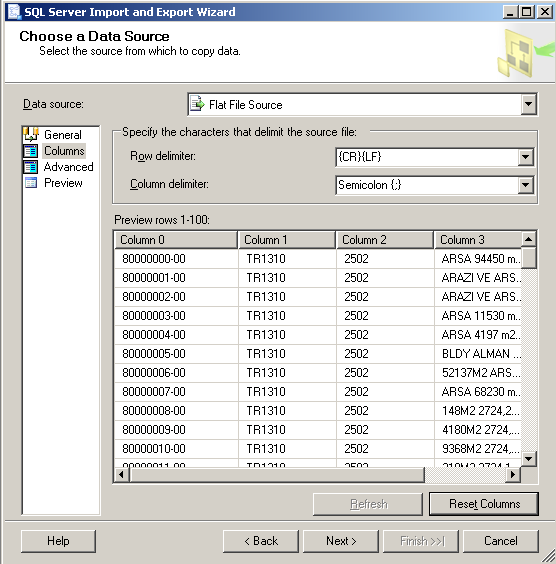
For more control over the flat file datasource, click on Columns tab on the left side of the screen.
SQL developers can define the column delimiter character in this import data task screen.
I'm using the semicolon from dropdown list since my datasource flat file, or text file contains column data seperated by semicolon ";" character.
SQL developers can test whether their row delimeter and column delimeter selection will work correct by pressing the Refresh buton.
In the below screenshot there is sample data, which is assigned to row and column values.
If the result is not as you expected, you can change the row delimeter and column delimeter.
Then by pressing Reset buton, a new preview data will be displayed based on the new delimeter options.
SQL developers and SQL Server database administrators will realize the dummy column names like Column 0, Column1, etc.
And the preview data is displayed in text format in the preview screen.
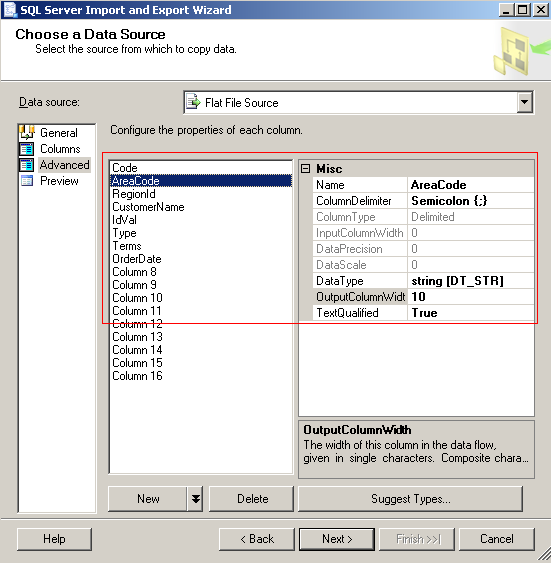
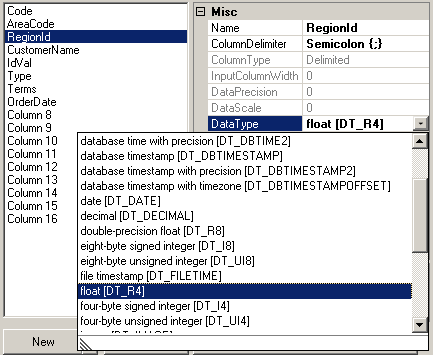
The Advanced tab enables, ETL developers or SQL professionals to determine the target column names.
Of course it will be better to define the target data type by selecting from DataType combobox.
If the target is a string data type, then the length of the target data can also be configured from the OutoutColumnWidth property.
There are numerous numeric datatypes ETL programmers can set as target SQL data type for conversion of delimeted data from flat file to SQL database data.
Possible numeric sql dataypes are decimal, double precision-float, eight-byte signed integer, eight-byte unsigned integer, float, four-byte unsigned integer, four-byte signed integer, etc.
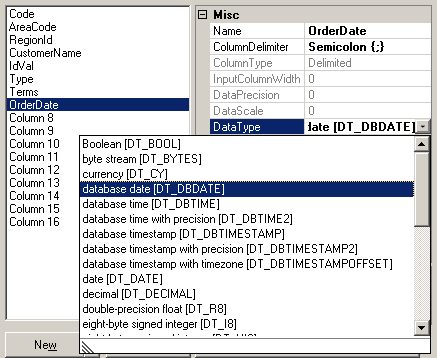
An important hint for SQL developers is about date and datetime column values.
If you want to convert from string to date data type, the code page and local settings in the first SQL Server Data Import and Export Wizard screen is very important.
Otherwise the resource value for date conversion will be read in wrong format causing sql conversion exceptions.
For example, SSIS package might throw sql convertion errors while expecting data in DDMMYYYY format instead of MMDDYYYY.
SQL Server DBA 's can convert input data from flat file to following SQL date data types:
database date DT_DBDATE,
database time DT_DBTIME,
database time with precision DT_DBTIME2,
database timestamp DT_DBTIMESTAMP,
database timestamp with precision DT_DBTIMESTAMP2,
database timestamp with offset DT_DBTIMESTAMPOFFSET,
date DT_DATE, etc
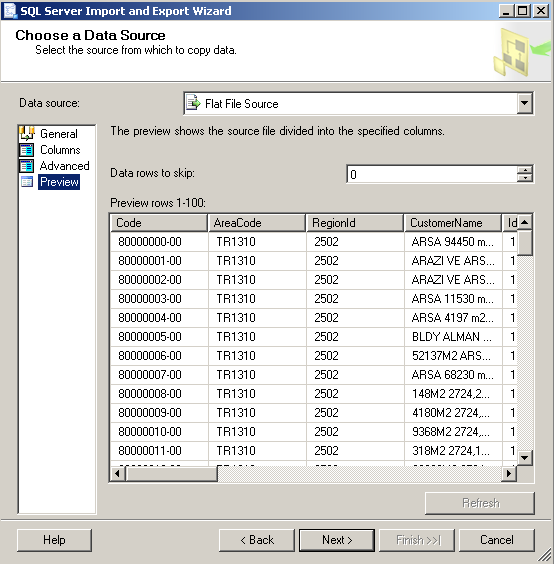
The last tab SQL programmers can use for configuring SQL import task for text file data source is Preview tab
It is possible to display preview data for rows after a specific number by providing a numeric value in the Data rows to skip text box.
If preview display is frozen, press Refresh buton to re-display data rows in preview mode for import data into SQL Server task.
The preview shows the source file divided into the specified columns.
In the preview display, first 100 rows after the number of rows specified in the "Data rows to skip" variable, are displayed in tabular view.
Configure Destination for SQL Server Import Data Task
The next step in SQL Server 2008 Import and Export Wizard enables SQL database administrators and ETL developers to set destination properties of data import export task.
Since our sql tutorial is about how to import data from text file into SQL Server database table, our target destination of the import task will be of course SQL Server instance.
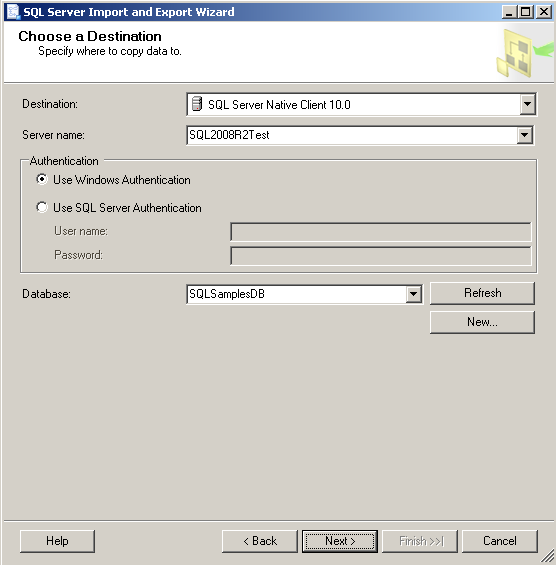
Choose a destination
Specify where to copy data to.
Choose the approtiate option from Destination dropdownlist.
Since I'm working with a Microsoft SQL Server 2008 R2 database instance, I choose SQL Server Native Client 10.0
Then provide the name of SQL Server instance in the Server name input area.
SQL programmers and ETL developers can choose whether to Use Windows Authentication or Use SQL Server Authentication by specifying a user name and password for the sql login.
The Database dropdown will be populated after Authentication method is defined.
You can Refresh the database name list for a new SQL Server instance by pressing Refresh buton.
The data in flat file will be copied into a destination table in the selected SQL Server database.
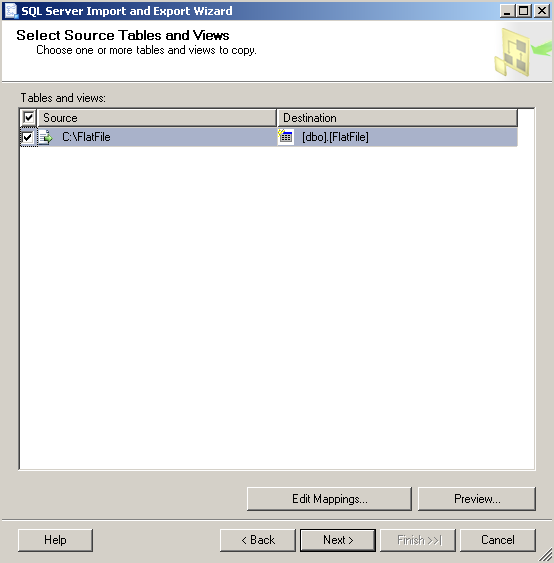
If you look at the above and below screens of SQL Server Import and Export wizard, you will realize that the data in text file C:\FlatFile will be copied into SQL Server instance SQL2008R2Test and sql database SQLSamplesDB in a table named dbo.FlatFile
SSIS package developers can change the name of the destination table by clicking on table name.
A mouse click on the destination sql table name will make the cell editable to enter a new sql table name for data import task.
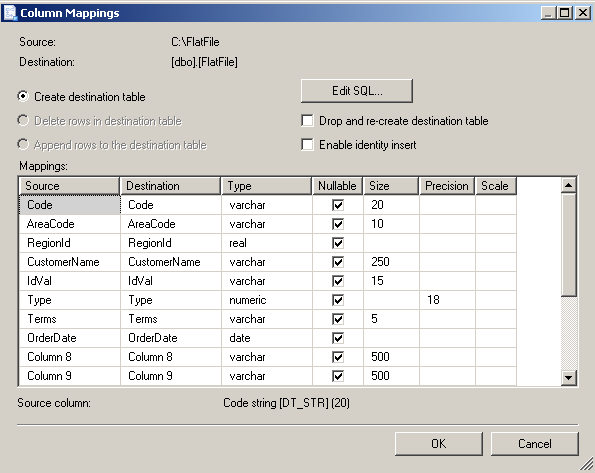
If you click on "Edit Mappings..." buton on the bottom of the screen, below Column Mappings import data wizard screen will be displayed.
On the column mappings screen, SSIS developers can define the table structure of the destination sql database table.
At the top of the screen, the data source file (text file) and destination table name is shown.
Then three important options is displayed according to the existance of the target sql table in the database.
Create destination table
Delete rows in destination table
Append rows to the destination table
If destination sql table does not exist in target SQL Server database, the first option will enable SSIS package to create the destination table before executing data import task as well.
If destination table does not exist in target SQL database, the other two options will be available.
SSIS package developers may choose to delete rows in destination table before running SQL Server import task.
Or choose to append data rows in datasource text file as new rows into the destination table.
If sql administators mark "Drop and re-create destination table", each time this SSIS package is executed the existing destination table will be dropped and recreated by sql script generated by the import task wizard.
"Enable identity insert" will run "SET IDENTITY_INSERT [table name] ON" command before executing data import task.
This will enable insert values into identity columns in the destination table.
The selections among given options will affect the success of the SQL Server data import task very much.
Especially if SQL Server administrators plan to run SSIS package using SQL job periodically, the import task might throw exceptions on the second execution even if it works successfully for the first time.
The reason is generally the existance of the sql table which was considered to be created before import task execution.
Save and Run SQL Server Import Task as SSIS Package
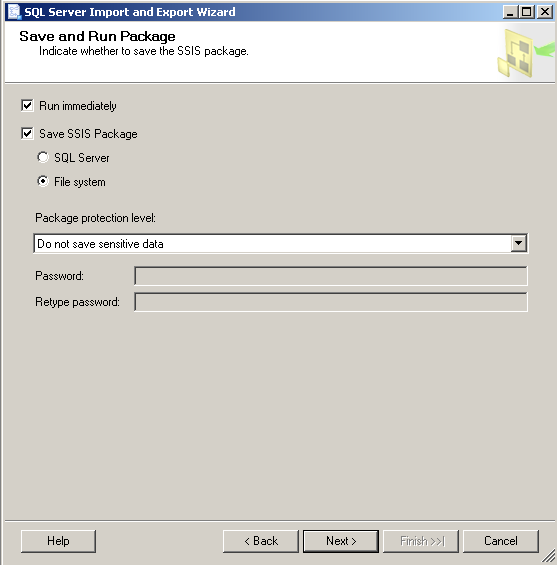
SQL developers, ETL developers or SQL Server administrators can prefer to run SQL Server import task as SSIS package only for one time, or to run and save SSIS package for later use.
If the created SQL Server data import task will be processed periodically or frequently, it is reasonable to create a SQL Server job which will execute SSIS package in order to save time and minimize errors.
If "Run immediately" checkbox is left as marked (default), at the end of the SQL Server Import and Export Wizard the SSIS package will be executed to copy data from flat file into SQL Server table.
If "Save SSIS Package" check is marked, then two option will be available.
Developers will be able to save SSIS package in SQL Server Integration Services instance or on File system as .dtsx file
If you plan to create SQL Server job to run SSIS package periodically it does not matter where you chose to store SSIS package.
But the security of the SSIS package .dtsx file will be affected from your choice.
You can decide if it will be safer to store SSIS package on server file system in a file folder, or to store SSIS package in a Microsoft SQL Server Integration Services instance.
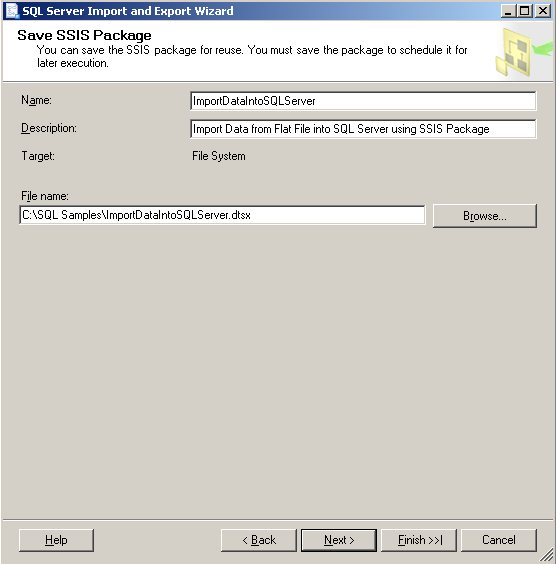
In this SQL tutorial, I preferred to store SSIS package on file system with file properties as seen below.
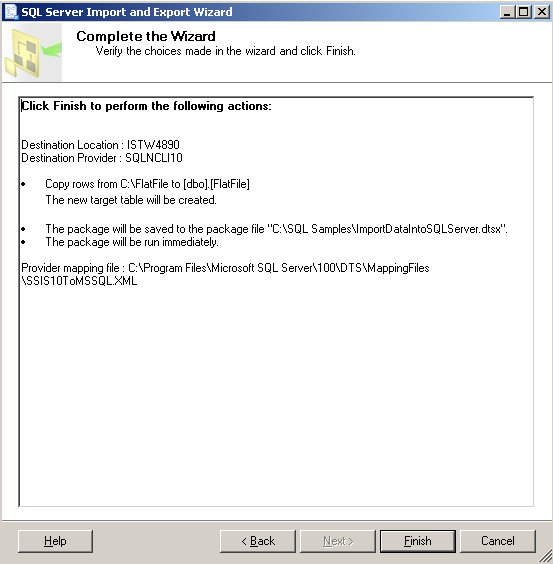
The next wizard screen will summarize the configured import data into SQL Server task.
SSIS package developers can correct possible errors using the Back button to return to previous wizard screens and modify task options.
After SQL Server 2008 R2 Data Import and Export Wizard task creation is completed, SQL professionals are now ready to execute sql data import task.
Just click Finish buton to run SQL Server data import SSIS package.
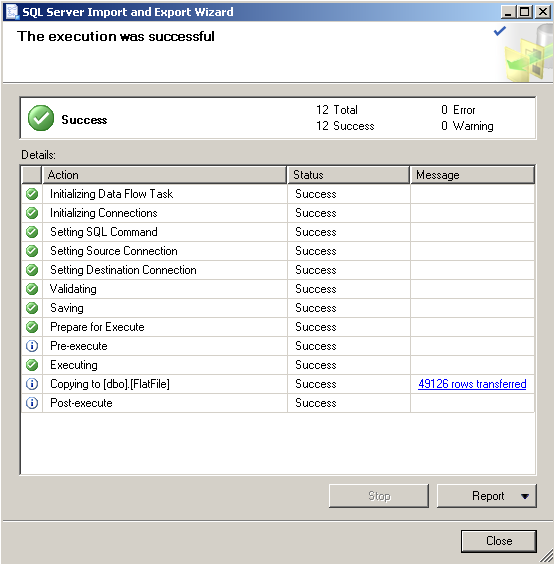
SQL Server engine will process each data import task step.
You will see each task execution in real time. The data import wizard will display the returned result of each step in Status column.
If you see green Success information remarks then, you will be successfully complete SQL Server import task.
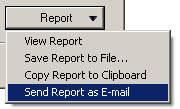
After the execution of the SQL Server data import SSIS package, SQL administrators and developers can export task result as a report using different methods.
Below, you can see that it is possible to take the SQL Server Import and Export Wizard execution result by copying the data into Clipboard to paste it on an other application.
DBA's or programmers can also send report as e-mail or save report in a new file.
Or simply display report data on the SSMS screen.
I hope to be useful for SQL Server administrators and sql developers who want to use SQL Server tools (like SQL Server Import and Export Wizard) for importing data into SQL Server 2005 or SQL Server 2008 from external data sources like flat file or text file.

