How to Create OLAP Cube using Business Intelligence Development Studio
SQL Server Business Intelligence developers can create Analysis Services and Integration Services projects as well as Reporting Services projects using SQL Server Business Intelligence Development Studio aka BIDS.
With each new SQL Server version, the Business Intelligence platform for BI developers has developed much in order to provide mature solutions to the requirements of customers.
Although it was possible to create OLAP cubes in SQL Server 2000, with the new CTP version release of SQL Server 2011, creating OLAP cubes, Data Mining analysis, serving Analysis Services data using Reporting Services reports is much more easier.
In this OLAP tutorial, I want to demonstrate how to create OLAP cubes in SQL Server Analysis Services 2008 R2.
Please note that the basic steps of creating a Analysis Services project, creating dimensions and OLAP cubes within the SSAS projects are all same in SQL Server 2005, SQL Server 2008 and SQL Server 2008 R2.
Here are the steps to create Analysis Services OLAP database project in Microsoft SQL Server 2008 R2 instance using the SQL Server Business Intelligence Development Studio (BIDS).
Create Data Source
Create Data Source View
Create Cube Dimensions
Create OLAP Cube
How to Create Data Source in OLAP Database
The first thing to do in a MS SQL Server Analysis Services database project is to create data source objects.
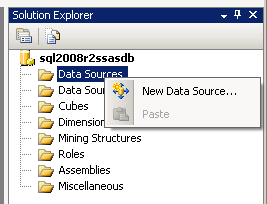
On the right pane within the Solution Explorer windows, click on the Data Sources node.
Open the context menu by a right click and select "New Data Source..."
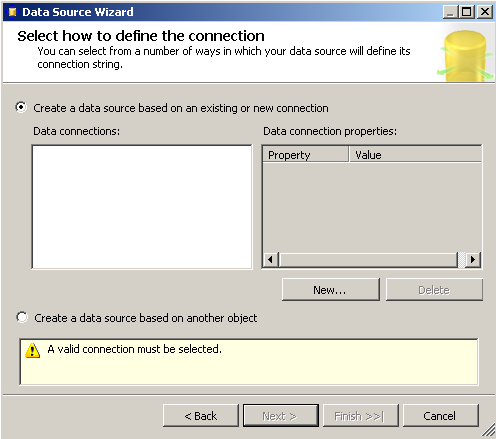
New Data Source command will start the Data Source Wizard within the Analysis Services project.
First a new data connection should be defined. If you have already defined data connections to SQL Server database instances or to other data source objects, you can select one using this screen.
If you have not defined any data connection yet, you can create new data connection by pressing the "New..." buton.
A valid connection must be selected for creating a data source.
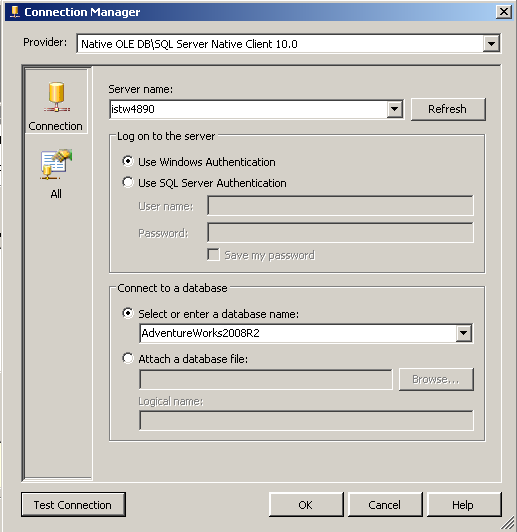
"New" buton will fire the Connection Manager screen.
The default data provider is "Native OLE DB\SQL Server Native Client 10.0"
There is a long list of available providers for use of Business Intelligence developers :
.Net Providers
SqlClient Data Provider
OracleClient Data Provider
SQL Server Compact Edition Data Provider
Microsoft SQL Server Compact Data Provider
Microsoft SQL Server Compact Edition Client Data Provider
Native OLE DB
Microsoft Jet 4.0 OLE DB Provider
Microsoft Office 2.0 Access Database Engine OLE DB Provider
Microsoft OLE DB Provider for Analysis Services 10.0
Microsoft OLE DB Provider for Analysis Services 11.0
Microsoft OLE DB Provider for Data Mining Services
Microsoft OLE DB Provider for Indexing Service
Microsoft OLE DB Provider for OLAP Services 8.0
Microsoft OLE DB Provider for Oracle
Microsoft OLE DB Provider for Search
Microsoft OLE DB Provider for SQL Server
Microsoft OLE DB Simple Provider
MSDataShape
OLE DB Provider for Microsoft Directory Services
SQL Native Client
SQL Server Native Client 10.0
SQL Server Native Client 11.0
Since I'll create data connection to SQL Server instance, I will not change SQL Server Native Client 10.0 Provider type.
You can write the name of the SQL Server instance in the "Server name" area. In the Log on to the server section, you will select one of the Windows Authentication or SQL Server Authentication methods. The last option is the target database for the data connection.
I will use the SQL Server 2008 R2 database instance on my laptop for this example. And I want to display data from AdventureWorks sample database for this SQL OLAP cube example.
You can control and verify SQL Server data connection using the "Test Connection" buton.
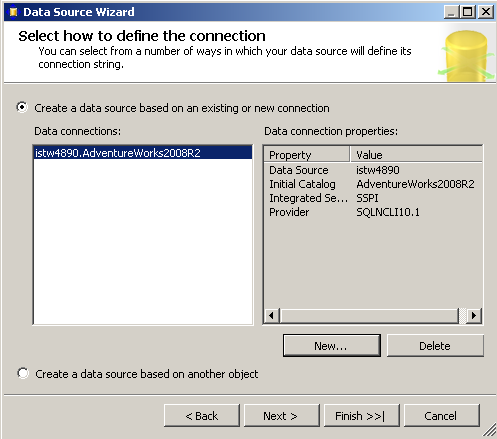
After you test sql data connection is working you can click "OK" buton to return back to following Data Source Wizard screen.
This time the new created data connection is also listed in the available Data connections list.
After you select the required data connection click on "Next" button to continue for the Impersonation Information screen.
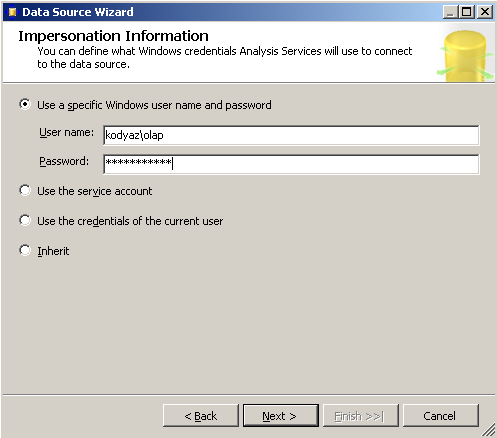
Impersonation information enables you define the Windows credentials that the SQL Server Analysis Services will use to connect to the data source.
Available options are :
Using a specific Windows user name and password, which you will set as a permanent username and password in this wizard screen, or
Use the service account credentials, or
Using the current user credentials, or
Inherit.
I defined a constant Windows user for Analysis Services to connect to the data source. If you force policies to change user password periodically you have to maintain this screen every time the password is altered.
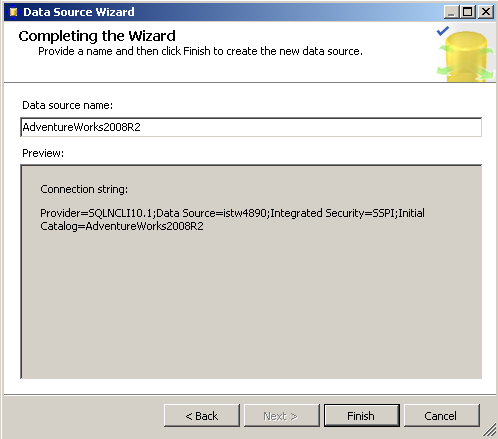
The next screen is the last screen in the Data Source Wizard in Analysis Services project. Give a name to the data source, and click Finish buton to end the Data Source creation.
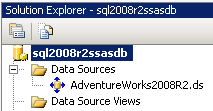
After the data source is created, you will see the new data source listed under the Data Sources node in the Analysis Services project solution explorer window as follows.
How to Create Data Source View in OLAP Database
The second step Business Intelligence developers should follow is to create data source view objects using the data source created in previous step.
Open the Analysis Services project.
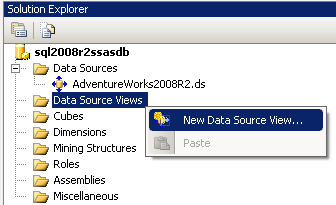
Click on Data Source Views node.
Right click on Data Source Views node and select New Data Source View... menu item.
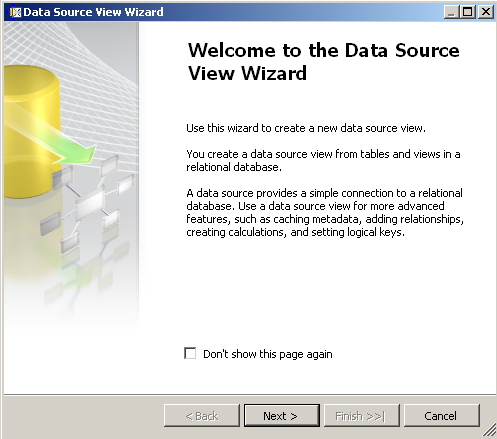
This menu selection will execute the Data Source View Wizard as seen in the below screenshot.
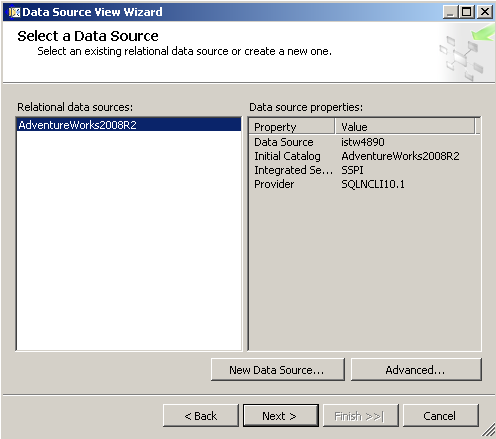
First select a Data Source.
If the listed data sources does not contain the data source you want to use, you can create a new data source using the "New Data Source..." buton.
Select and highlight the data source and click next buton. A data source selection sets the SQL Server instance, and the sql database on the target SQL Server.
A datasource view definition is a little bit more in detail. Data Source View brings a group of sql tables related with each other just like creating a sql view in a SQL Server database.
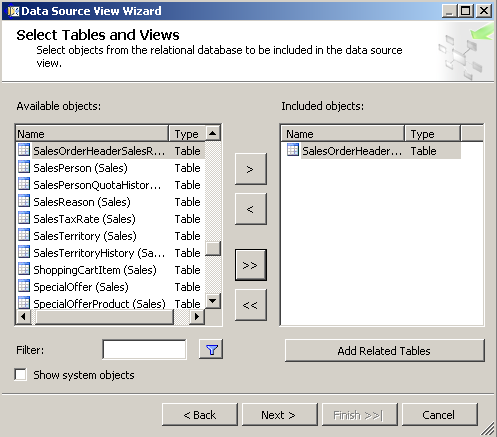
For this SQL Server Analysis Services OLAP Cube tutorial, I want to choose the SalesOrderHeader table from Sales schema in the SQL Server sample database AdventureWorks.
After selecting the SalesOrderHeader sql table and moving it to the right pane, included objects window, you can click on the Add Related Tables buton in order to add related tables automatically. This will let Business Intelligence developers to create star like OLAP structures.
But for the simplicity of this OLAP tutorial, I will just include single table SalesOrderHeader and display sales amounts in various time periods. So I do not need any other dimension except time dimension. Because of this reason, the fact table will be SalesOrderHeader. I don't need any other lookup table for this simple OLAP cube.
Click Next buton for following step.
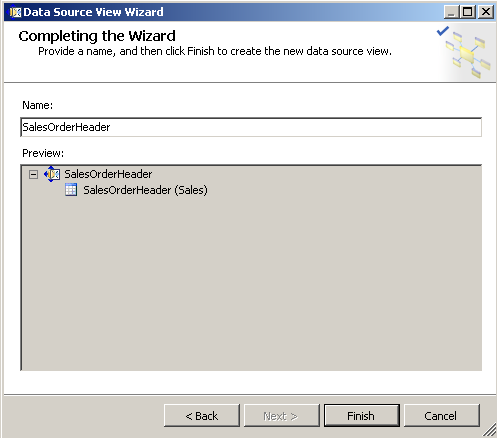
The last step in data source view creation is to give a name to the data source view.
Click Finish buton to create the Data Source View. After you create the data source view, the dsv object is displayed in the Solution Explorer under the Data Source Views node.
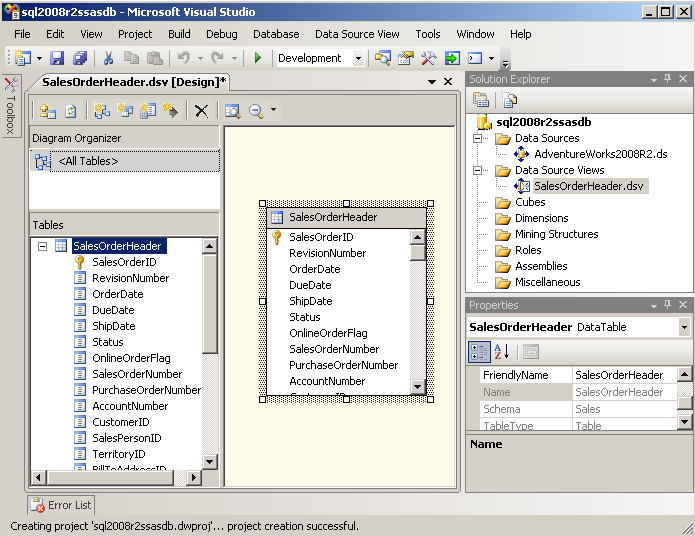
Also the tables included in the data source view will be displayed in a new window opened for the new data source view just like shown in below screenshot.
How to Create New Dimension in OLAP Database
After fact tables and dimension tables are included within the data source views in the Analysis Services project, BI (Business Intelligence) developers are ready to create dimensions for OLAP cubes. It is important to create dimensions independent from OLAP cubes. Because a dimension can be used for more than one OLAP cube. And if a dimension is used in more than one cube, processing the dimension alone will refresh the data for all related OLAP cubes.
Shared dimensions in SQL Server Analysis Services enables faster processing times for the related OLAP cubes.
Let's start creating a new dimension.
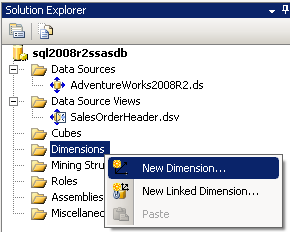
Click on the Dimensions node in the Solution Explorer windows and select New Dimension menu item from the context menu.
This menu selection will trigger the Analysis Services Dimension Wizard for creating a new dimension within the Analysis Services project to associate with OLAP cubes.
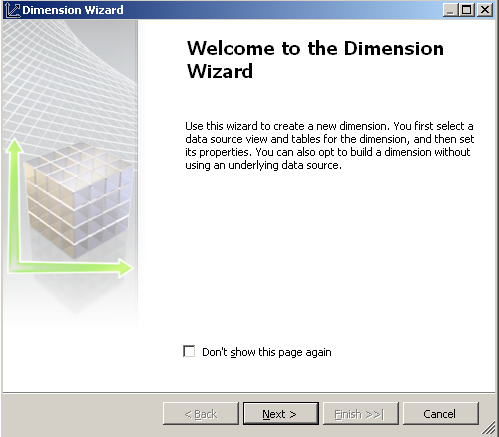
Welcome to the Dimension Wizard
Use this wizard to create new dimension. You first select a data source view and tables for the dimension, and then set its properties. You can also opt to build a dimension without using an underlying data source.
If you click Next buton to continue, business intelligence developers can see the options to create new dimension for use in the Analysis Services project in various OLAP cubes.
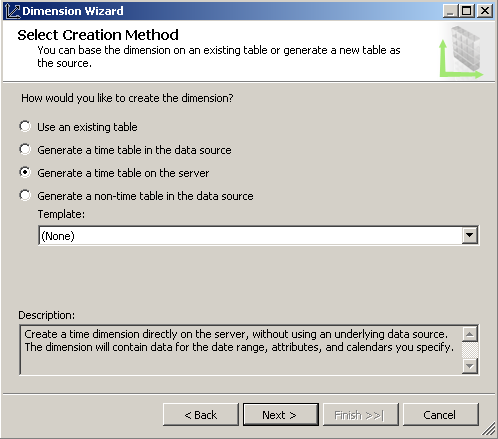
In the following dimension wizard screen, business intelligence (BI) professionals will select the method of creating dimension.
The new OLAP cube dimension can be created either based on an existing table or can generate a new table as the source of the new dimension.
As you can see the all four options for methods of creating dimensions are :
Use an existing table,
Generate a time table in the data source,
Generate a time table on the server,
Generate a non-time table in the data source.
For our OLAP cube example, I want to create a time dimension expressed in different periods.
So I choose to generate time table on the server option for creating the new OLAP cube dimension.
As seen in the description note, this will create a time dimension directly on the server, without using an underlying data source.
The dimension will contain data for the date range, attributes, and calendars you specify.
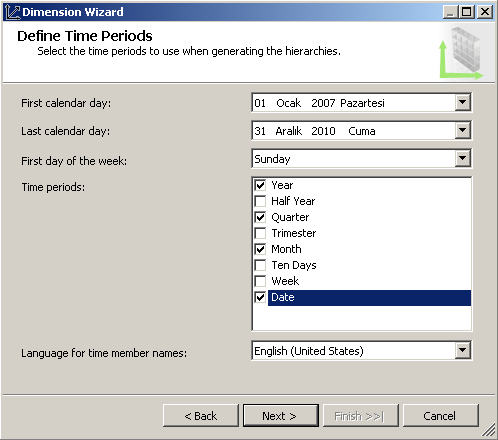
Click "Next" buton for the next screen in Dimension Wizard which will help the BI developers Define Time Periods
Defining time periods for the time dimension will enable developers to create the time hierarchies which will be used in display of the OLAP data.
For example, for my sample time dimension I chosed the time period to start from 01/01/2007 and end at 31/12/2010.
BI developers can also set details like first day of the week, the language for time member names.
And the most important detail in the below screen is the time periods selection section which enables business intelligence developers to select the time hierarchy in time dimension.
Selectable time periods for an OLAP cube time dimension are :
Year,
Half Year,
Quarter,
Trimester,
Month,
Ten Days,
Week, and
Date,
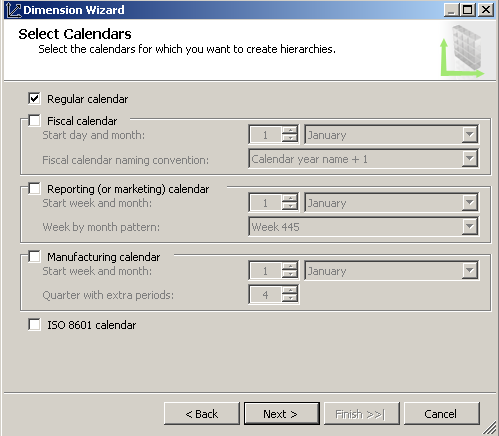
The following screen in time dimension configuration enables developers to select calendars for which they want to create hierarcies.
Calendar types are :
Regular calendar,
Fiscal calendar which is configurable,
Reporting (or marketing) calendar which can be configured,
Manufacturing calendar which is configurable also, and
ISO 8601 calendar,
Let's continue to create dimension with regular calendar.
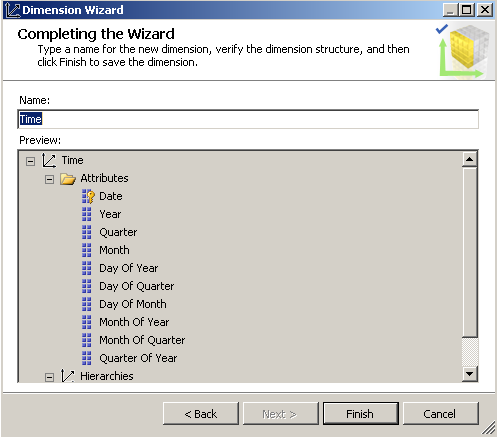
Click Next buton. We are now very close to end Time dimension creation.
Give a name to the time dimension and click Finish.
The new created dimension will be displayed in the Business Intelligence Development Studio.
You can click Save All icon to save your changes to the Analysis Services project.
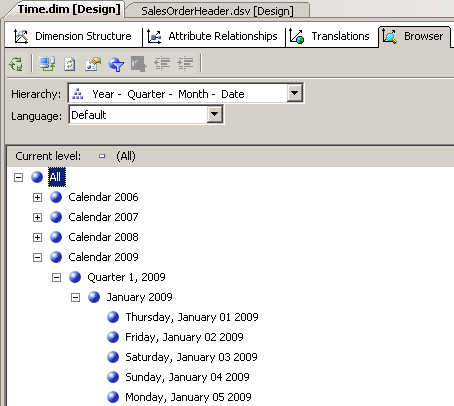
Let's now browse dimension data. Go to Browser tab while you are in the dimension screen.
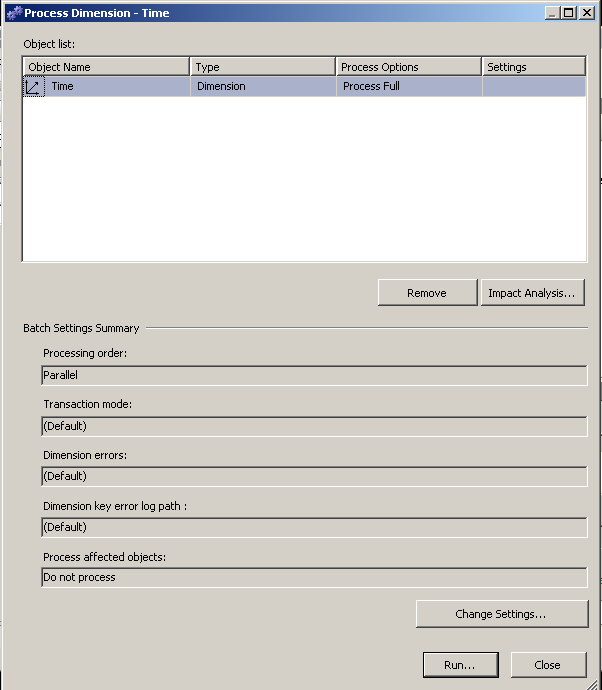
Press the Process icon.
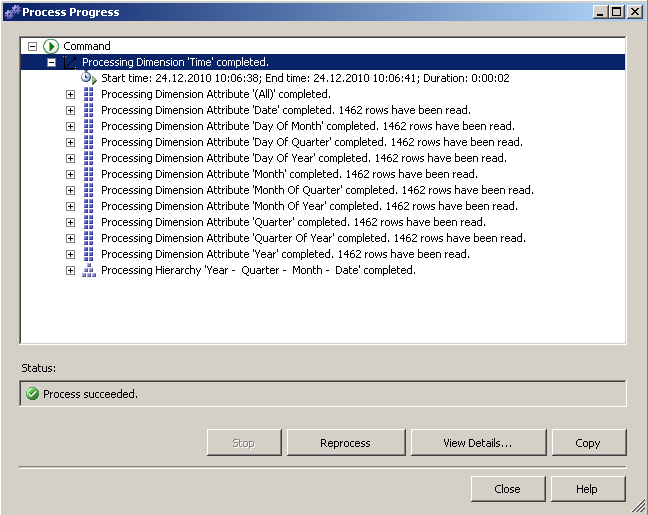
The process management screen will be displayed. You can further configure process settings for time dimension process or click Run buton to start dimension process.
The time dimension process details will be listed step by step as seen in the following screenshot.
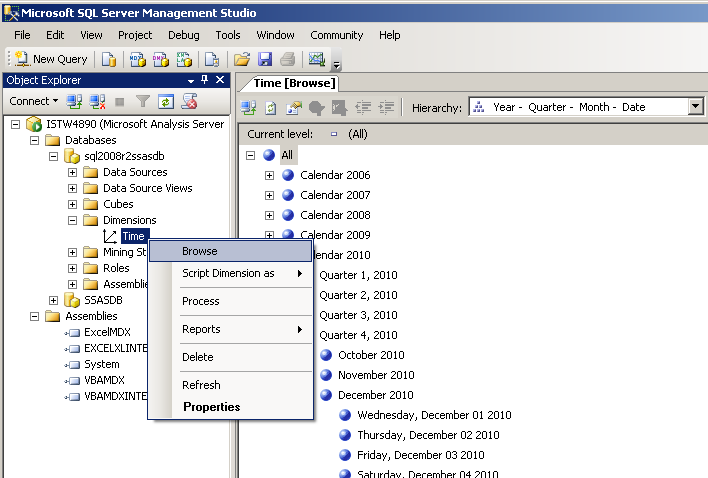
From the Object Explorer window, drill through Dimensions node for Time dimension.
When you right-click on time dimension and select Browse from the displayed menu, it is possible to see the dimension data in the Cube Browser tab.
Business Intelligence developers can go to browse the time dimension data in Year - Quarter - Month - Date hierarchy as follows in the BIDS Olap cube Browse tab.
How to Create New OLAP Cube in SQL Server BIDS
Microsoft developed SQL Server Business Intelligence Development Studio (BIDS) for use of BI developers to create OLAP cubes.
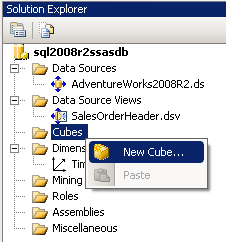
When you are in the Analysis Services project, open the Solution Explorer and right click on Cubes node. Select New Cube... from the context menu.
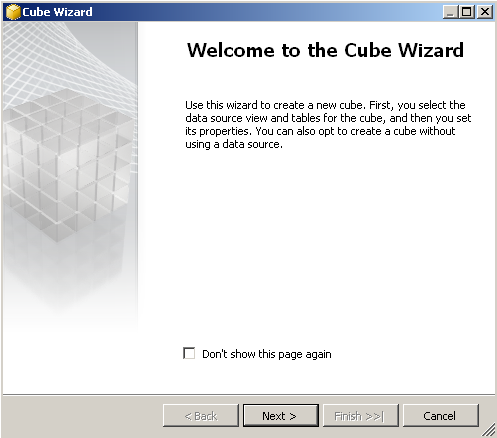
New Cube... menu selection will start the SQL Server Analysis Services Cube Wizard.
Business Intelligence developers can use this wizard to create a new cube.
As written on the create new cube wizard screen, the first step to do is to select data source view and tables for cube data.
Then the cube properties should be configured like olap measures and olap cube dimensions.
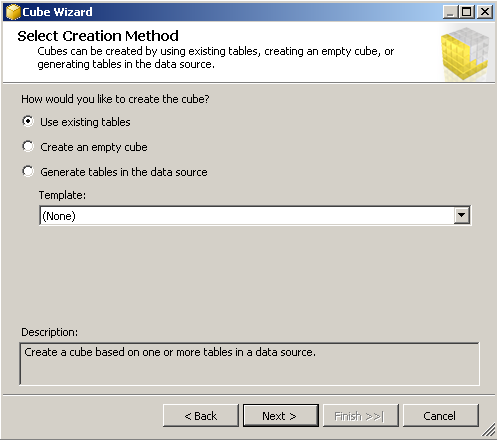
The second screen enables business intelligence developers to select cube generation method.
In this step sql developers can select one of the below three options :
Create cube using existing tables,
Create empty cube, or
Generate tables in the data source.
In this olap tutorial, I'll use the data source view that we have created before.
So let's continue with the first option to create cube based on one or more tables in a data source.
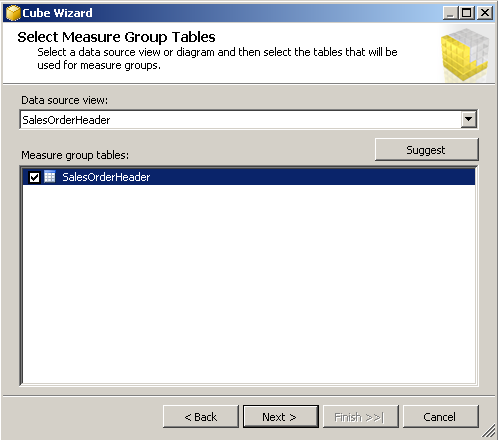
The next wizard screen enabled BI professionals to choose data source view from existing ones for the OLAP cube measure groups.
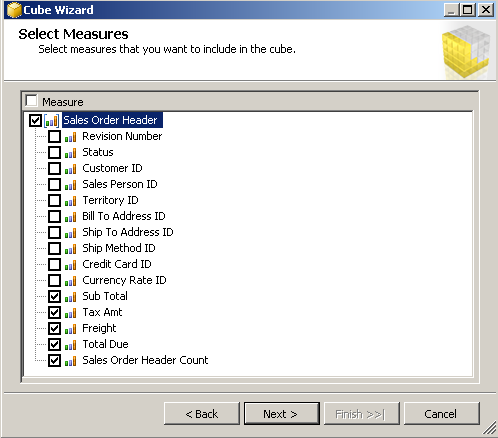
After cube measure group tables are selected, developers can select the measures that they want to include in the OLAP cube using the selections in this screen.
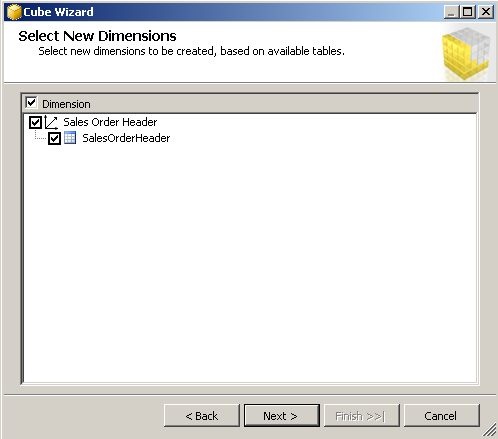
The following step is the OLAP cube dimension selection step.
Business Intelligence developers can select dimensions from available tables.
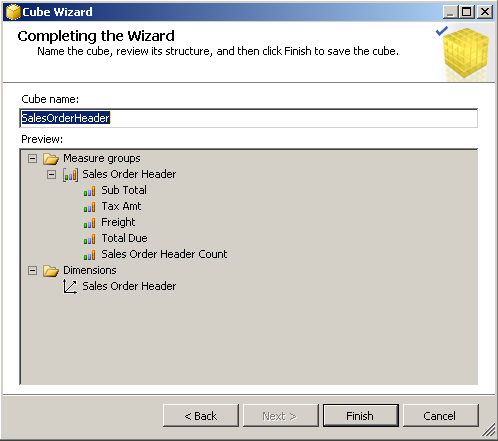
After cube measures and cube dimensions are created, the last step comes where developers can review the OLAP cube structure and give a name to OLAP cube.
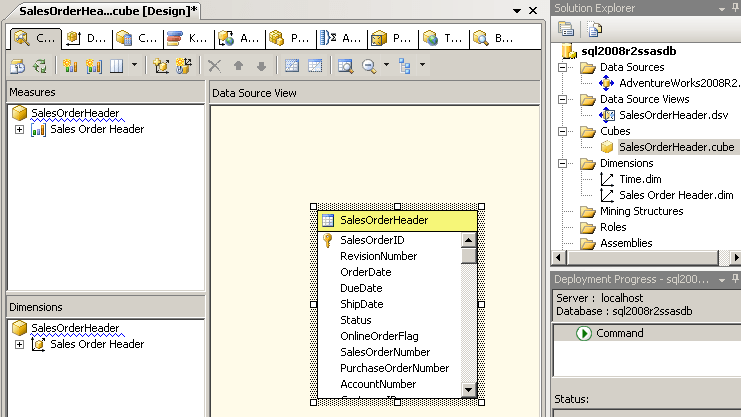
Here you can see how the Business Intelligence Development Studio (BIDS) is seen after the OLAP cube is created.
The Development Studio will display a warning informing you to build OLAP project first :
Microsoft Visual Studio
The server content appears to be out of date.
Would you like to build and deploy the project first?
You can press Yes to build the project and then deploy it to the SQL Server Analysis Services.
On the left pane, you will see the Dimensions window.
I want to add the time dimension we have created in the beginning of this OLAP tutorial.
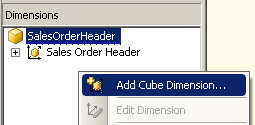
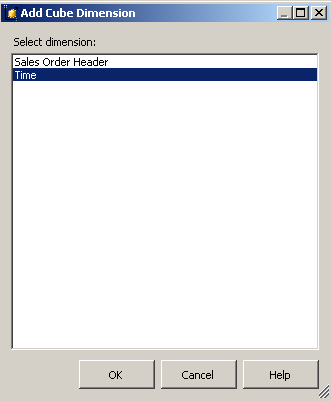
So click on the OLAP cube name, right-click, then select "Add Cube Dimension..." from the context menu.
Then you can select the time dimension from the existing cube dimensions.
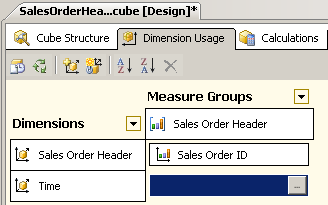
Now we can see two dimensions in the Dimensions windows.
In this OLAP tutorial, within the sample OLAP cube we will not use any dimension from the SalesOrderHeader.
But we will use the Time dimension within the cube.
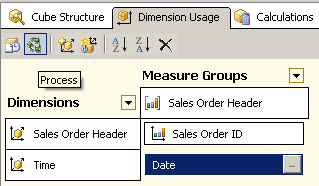
Configuring Dimension Usage tab is the most important task that defines the success of creating OLAP cube using SQL Server Business Intelligence Development Studio.
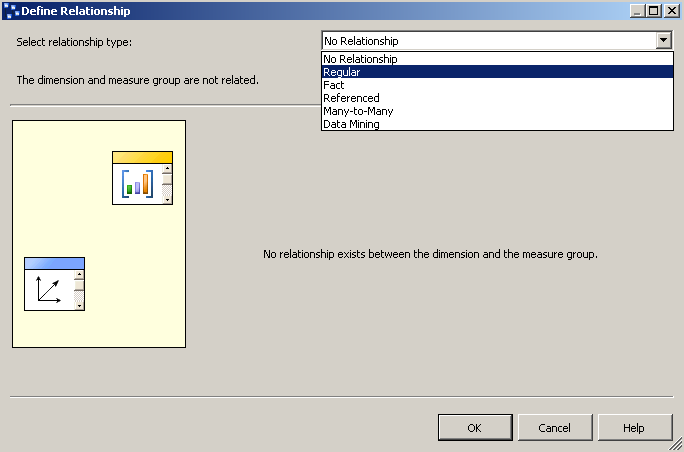
In this step, Business Intelligence developers join the fact table and the dimensions by defining the join column and relation type.
Possible relation types are listed as :
Regular,
Fact,
Referenced,
Many-to-Many,
Data Mining, and
No Relationship.
Select Regular relation type to relate dimension and measure groups.
This is like sql table joins in SQL Server database queries.
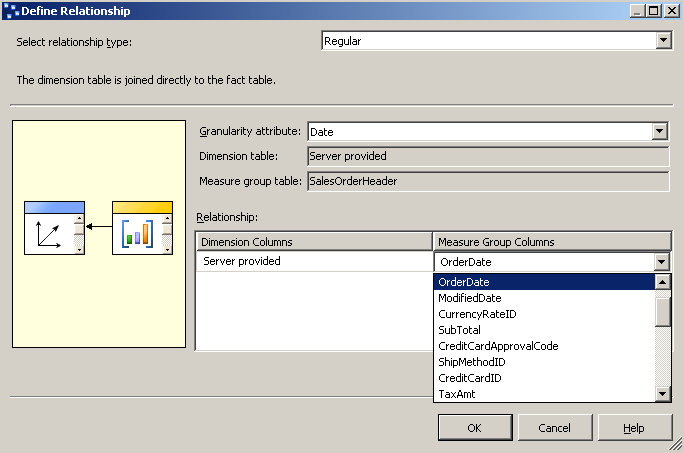
After selecting dimension and measure group relation type, choose the columns that will create the relation.
The dimension column is already set in the time dimension.
Business Intelligence developers can select OrderDate column from measure group to display OrderDate in the time dimension in OLAP cube.
And the resultant relationship build between Meaasure Groups and Dimensions especially for Time dimension respect is over Date as follows.
If you click on the green icon "Process" to see how OLAP cube data will be created, you will see a warning requesting to build and deploy the Analysis Services project first.
I guess developers get used to the above message. Click Yes to build and deploy project to Analysis Services server.
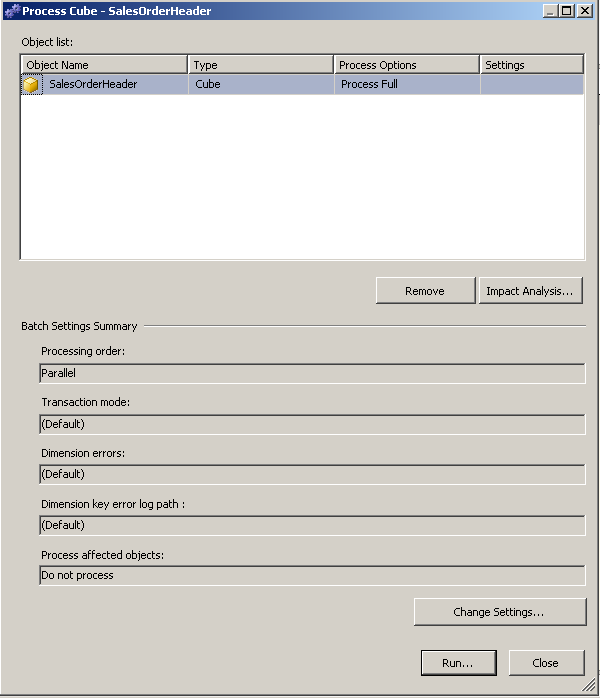
After project build and deployment is completed, the process cube management screen will be displayed as follows.
BI developers can process SalesOrderHeader OLAP cube by pressing Run... buton.
But before processing OLAP cube, we can have a look at the process settings.
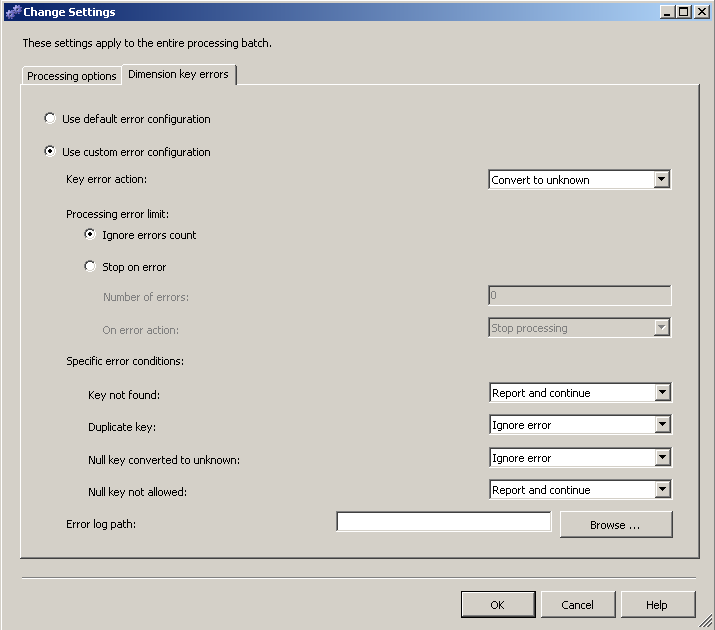
OLAP developers can change settings to ignore errors count during OLAP cube processing.
In order to change OLAP processing settings click on "Change Settings..." buton.
On the displayed screen, BI programmers will notice that there is a tab named "Dimension key errors".
Instead of using default error configuration, developers can create a custom error configuration which will prevent processing dimension errors to stop the OLAP cube generation.
Chose "Use custom error configuration", then select "Ignore errors count".
Browse OLAP Cube Data
Business Intelligence developers, or BI developers can browse OLAP cube data using the Browser tab of the OLAP cube screen.
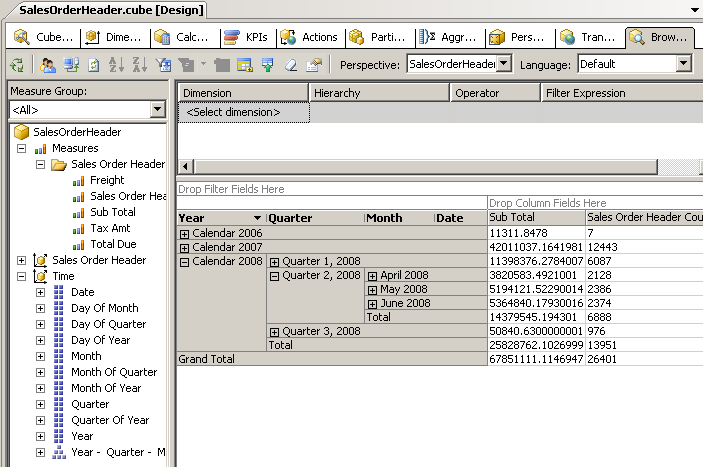
Here in the below screenshot, you can see that the Sales header data of the AdventureWorks sample database is displayed as sql OLAP cube data in Data Browser tab.
You can see the time dimensions which is hierarchical in Year, Quarter, Month and Date base.
The measures are selected as the sub total values and the sales order header count within the selected time period.
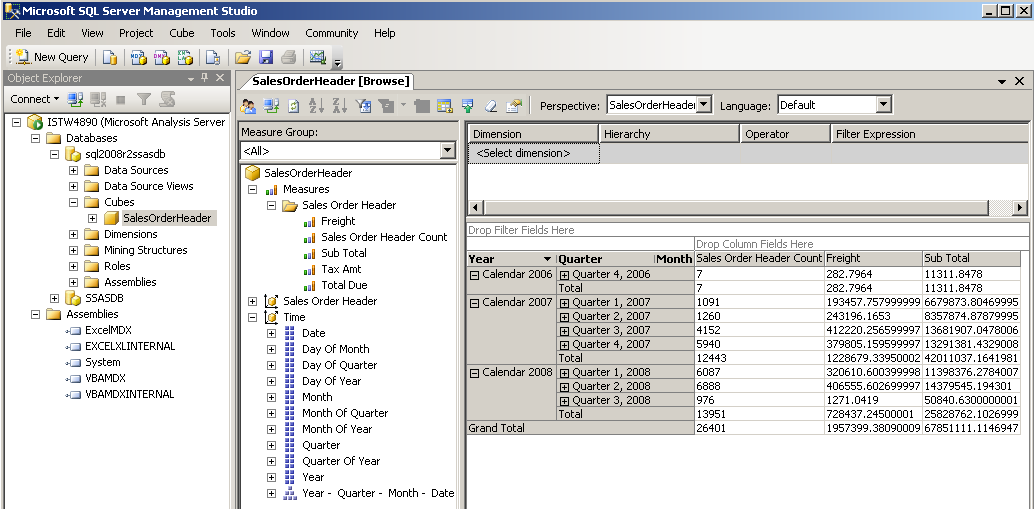
BI developers or sql programmers can browse the same OLAP data within the Microsoft SQL Server Management Studio (SSMS) as seen in the following screenshot.
After the SQL Server Analysis Services project is deployed to the target SQL Server Analysis Services instance, as in this case SQL Server 2008 R2, the OLAP cube can be seen under the Cubes node of the related Analysis Services database.
Business Intelligence developers can choose the OLAP cube and then by a right-click they can choose the Browse Data context menu item to display sql OLAP cube data.
Business Intelligence professionals can choose any time dimension for required reporting solution.
The available measures in our OLAP cube example are also seen in the measures list as Freight, Sales Order Header Count, Sub Total, Tax Amount and Total Due amounts.
After dropping the approtiate OLAP data measure and time dimension, the sql developers can browse the OLAP data as a reporting and data analysis solution.

