Use Windows Task Scheduler for Website Monitoring
A Task Scheduler software is a tool for tasks done periodically like website monitoring. In my previous Visual Studio tutorial, I've shared C-Sharp source codes of a website monitoring application developed using Visual Studio 2013 IDE. In this tutorial, I'll show how we can use Windows 7 Task Scheduler tool to execute this application based on a time schedule automatically to monitor websites easily. You can of course run a different application according to your requirements.
You can find Task Scheduler program by typing its name on the Start menu search program and files textbox. When you type the word task, Windows Task Scheduler program will be listed for you to run it immediately.
Another way of openning the Task Scheduler software is following the Start Menu > All Programs > Administrative Tools > Task Scheduler menu options.
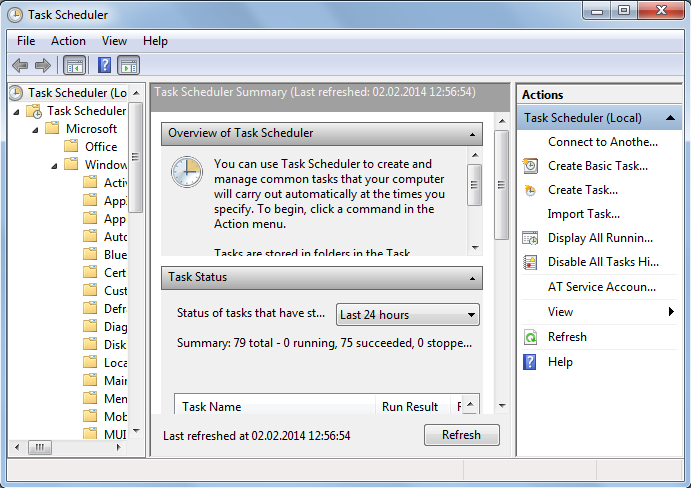
Windows Task Scheduler software for Windows 7 users
Windows 7 task scheduler tool has 3 main windows as seen in below screenshot.
The first window located on the left side is the list of stored tasks grouped in folders named Task Scheduler Libraries.
The section seen in the middle provides a summary or an overview of the latest status of tasks defined on the connected computer where the local computer is the default one.
The section on the right enables Windows users and system administrators or the developers to create new tasks and schedule them for periodic execution.
Windows users can either use Create Task or Create Basic Task link buttons to start creating a new task and configure the task parameters, provide its parameters if necessary and define a schedule for its periodic execution.
Since Create Task command provides more detailed calendar for scheduling tasks, I prefer Create Task instead of Create Basic Task wizard.
You will agree with me since website monitoring requires frequently checking of a website health so the application must ping website every minute or every five minutes, so on.
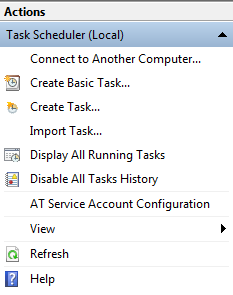
Use Actions menu options to create a new task using Windows Task Scheduler
Let's start scheduling our web site monitoring application using this task scheduling tool.
Press on Create Task...
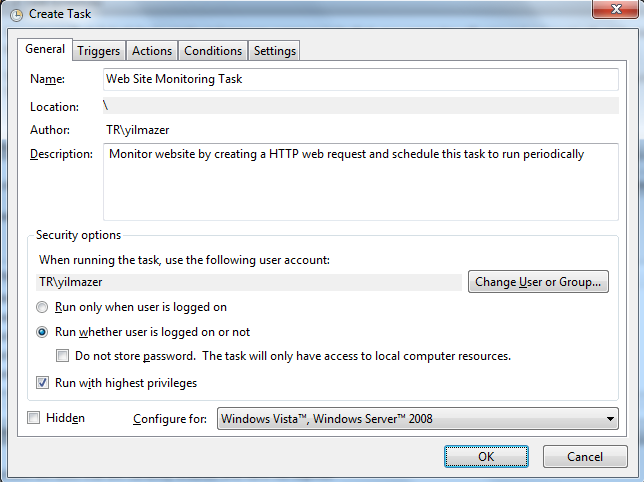
When the task definition screen is displayed provide a descriptive name and additional informative text for the new Windows task
Here for the sake of the Visual Studio tutorial, I provide title as "Web Site Monitoring Task" and the following text for description of this new task.
"Monitor website by creating a HTTP web request and schedule this task to run periodically"
Choose an user with enough permissions to ping a website, and create log files on the local disk for this task. Of course if your task has requirements more complex than website monitoring task, provide a validuser for all such authorization and permissions.
Since I want to get notified all the time even I'm not logged on the computer, I chosed "Run whether user is logged on or not" You can enter the user's password and let the Task Scheduler tool manage its security for executing the task automatically. I also mark the "Run with highest privileges" checkbox on Windows 7. Because the UAC (User Account Control) can prevent the application to execute with administrative permissions, or access to folders with write permission, etc. You can also test your Task Scheduler configuration and make later changes on such execution parameters.
Now press on Triggers tab and continue to screen where you can define a new task trigger. Task trigger screen enables developers and Windows users to run tasks periodically.
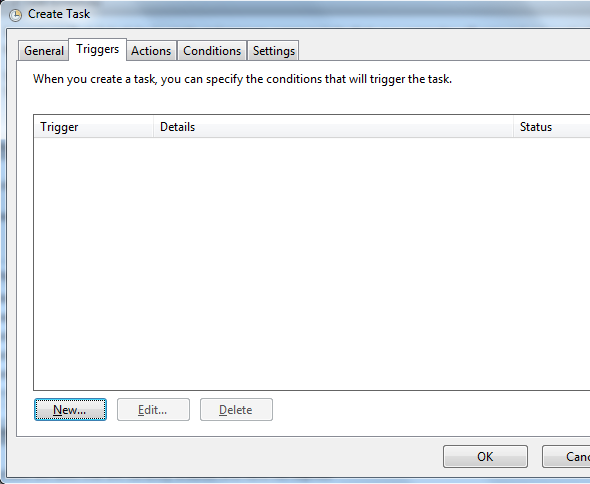
Windows Task Scheduler tool provides different kinds of trigger options which you can choose one among them for your task.
The list contains:
On a schedule (you define a calendar for execution times)
At log on (when a user logges on to the computer)
At startup (at computer start up)
On idle (process high resource requiring task when computer is idle)
On an event (when a predefined event takes place, run this task)
At task creation/modification
On connection to user session
On disconnect from user session
On workstation lock
On workstation onlock
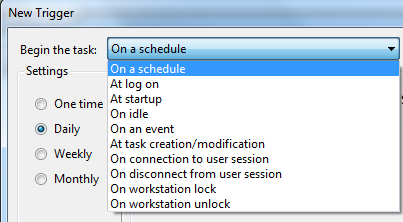
Since website monitoring is very important for web site owners, you can test the website health every 5 minutes. For this reason, choose "On a schedule" task begin option and the Daily setting on task trigger screen.
The task calendar should repeat itself every day, so set 1 for Recur every 1 day.
In Advanced Settings section, select 5 minutes in the "Repeat task every" configuration option.
I did not provide a temination date, so leave the Expire check unmarked.
Set the Enabled option to let your task start running immediately without a requirement to enable it later.
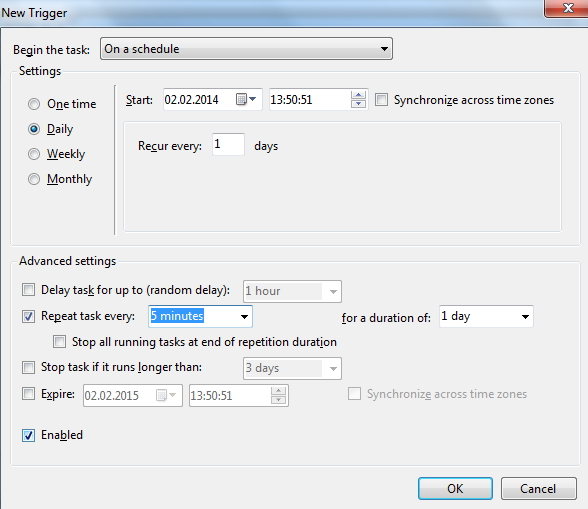
Press OK now to complete the task scheduler calendar and continue with defining the task steps.
Press on Actions tab on main Task screen. Press the New.. button to create a new action which is the steps of our repetitive task. When New Action screen is displayed as below, choose action as "Start a program" and browse the Windows folders for the target application. As seen below I've provided the path of the website monitoring application in the Program/script textbox.
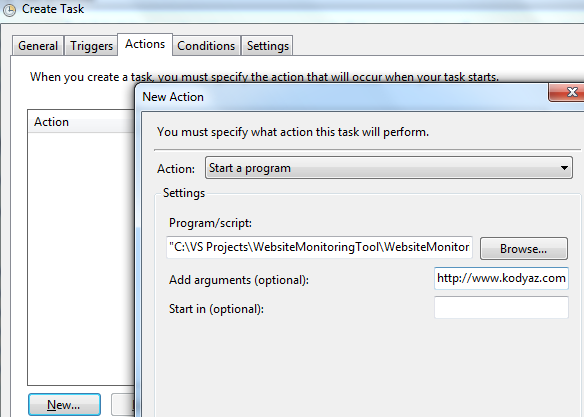
If the target application accepts parameters as mentioned in the previous website monitoring application tutorial, like the URL address of the web site to monitor, or the file path of the log files, etc the user can provide such additional parameters in the arguments part.
You will realize that I've provided the website URL address "http://www.kodyaz.com" in the "Add arguments (optional)" input area.
If you have more than one argument to pass to your application, leave a space between them.
What I mean is something like that. "http://www.kodyaz.com c:\monitoringlogs\kodyaz.txt"
The .NET application will take the URL as the first argument using args[0] array item.
The log file path will be read using args[1] array item within the monitoring application.
Press OK button to complete the task steps definition
We are now very close to the end of completion of the task for our sample monitoring website application. Click on OK button on main taks screen.
The task creation wizard will request the password of the Windows user for running this user even when we're not logged and provide authentication data without pausing the execution of the scheduling and prompt for user password on the screen. You will remember, in previous steps we have left clear the checkbox for "do not store user password"
If you have provided the user password, now Windows 7 Task Scheduler will execute your application periodically according to the calendar you have defined
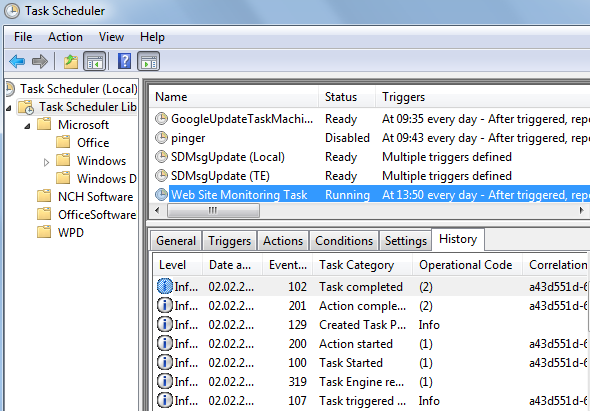
After a few manual or periodic execution of the target task, you can control the execution results from the history tab of of the related task. Windows Task Scheduler enables you to trace the outcome after each task run easily within the History section.
If you think this tutorial is more focused on scheduling web monitoring tool developed in Visual Studio rather than concentrated on the features of Windows 7 Task Scheduler tool, please read this dedicated tutorial about Windows Task Scheduler as a task scheduling tool
