Windows 7 Libraries: How to Create and Manage a Windows 7 Library ?
What are Windows 7 Libraries ?
Windows 7 Libraries are one of the new enhancements in Microsoft's new operating system Windows 7.
In fact Libraries in Windows 7 can be considered as a new content management tool just like many other tools for Windows 7 users.
Using Libraries in Windows 7 Explorer screens will make easier for Windows 7 users to organize their files like documents, photos, and music files distributed across their computer disk folders, network shares, and more.
A Windows 7 Library helps to organize files, photos, audio files, or documents scattered to many file folders, or on network shares.
The good part of Windows 7 libraries they don't store all these files in the same folder.
Libraries do not change the places where included files are stored.
You can think of a library as an index of grouped library items.
So Windows 7 users can find files faster and easier than ever using Libraries.
I want to give an example to make this Win7 tutorial a better Windows 7 libraries explained tutorial.
For example, you are working in a company and you want to bring together the work related files.
Let those files in different folders on your PC's drives, on external disk drives, on your laptop, etc.
And you can not move the places where those files are stored.
Windows 7 Libraries still help you create a virtual folder which is combining all those files located on different places within the same library folder.
All of the things that a Microsoft Windows 7 users will do is to create a library, give a name to the library and link the folders containing related files to the Windows 7 library.
In the end, although all files remain in their original places, Windows 7 users will see all files together in the Windows 7 library view.
It is notable to say that as a SQL developer, I find very much similarities between Windows 7 Libraries and SQL Server View objects.
Within a Win7 library, files, photos, documents, audio or video files have different properties listed in the library display screen.
This enables Windows users to change the sort order of library files according to their needs.
For example, a Windows 7 user can order the photos in the library according to their dates taken.
Or it is possible to sort documents according to their types, or order music files by their genre.
This feature shows the power of Windows 7 libraries, to order and sort files linked from different sources.
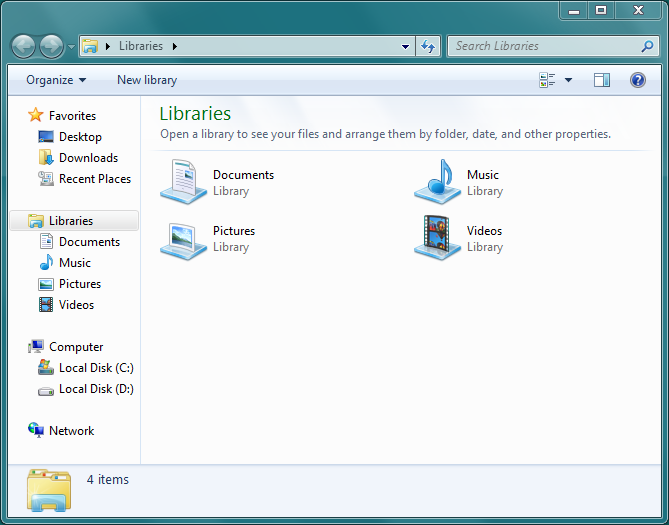
When you install Windows 7 on your PC, you will see that some libraries are already configured by default.
These pre-configured Windows Libraries are for documents, music files, audio files and video files and named as :
Documents,
Music,
Pictures, and
Videos.
Windows 7 users can easily alter properties of those libraries or can create new Windows library folders without any problem.
When Windows users open Windows Explorer window on a new Windows 7 PC, the first folder displayed by default is Windows 7 Libraries screen.
Here is a screenshot from the Windows 7 Libraries window.
Note that Libraries are new with Windows 7 operating system for Windows users. So Windows Vista users are not able to work with this new enhancement on their computers.
How to Manage Windows 7 Library ?
If you click on one of the existing Windows 7 Libraries, for example Windows 7 Documents Library, you will probably see a similar screen shown below:
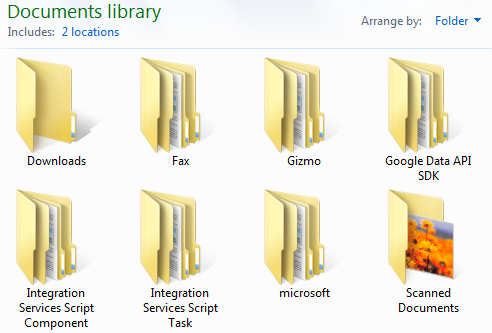
What is interesting here in this default Windows 7 Documents library is the Documents library includes 2 locations.
If you click on the given information of including locations, here in this sample library "2 locations" link, the Documents Library Locations screen will be displayed.
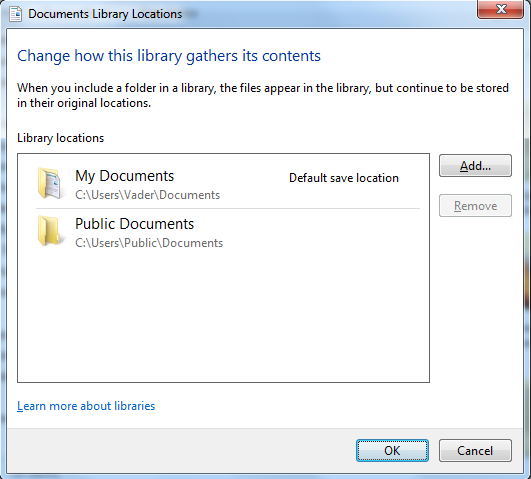
As you can see you can select one of the listed included folders, and by pressing Remove button you can exclude or remove folder which is selected from the current Windows 7 library.
Removing a folder from Windows 7 libraries does not mean that the original file folder will be deleted.
Only the contents of the removed file folder is not going to be listed among the files of the target Windows 7 library.
The files and the file folder are going to be exist in their original places in Windows system.
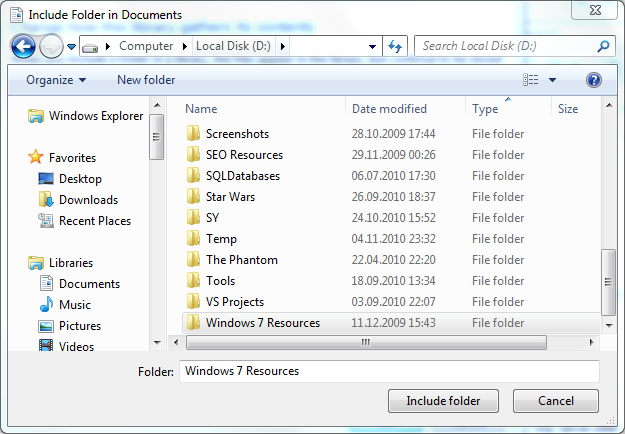
As the name also implies, when Windows users press on Add button by browing in the file system using Windows Explorer you can point and select a file folder to "Include folder" to the target Windows 7 library.
How to Change Default Save Location for a Windows 7 Library ?
One important detail with related to Windows library include folders is the "default save location".
The Default save location is the file folder where the physical file is saved when a new file is saved or pasted in the Windows 7 Library.
Windows users can change default save location by selecting an included file folder, and then right-click on the folder then select "Set as default save location" from the context menu.

How to Create Windows 7 Library ?
I believe users will choose to use libraries in Windows 7 since it brings many powerful document management capabilities.
It is very easy to create Windows 7 library for those users willing to use Libraries in Windows.
If you want to create a new Windows 7 library, you can follow the below steps in order.
1) Open Windows Explorer Windows 7 Libraries screen.
2) Right click on an empty space within the windows and display the context menu.
Choose "New > Library" in order to create new Windows 7 library.
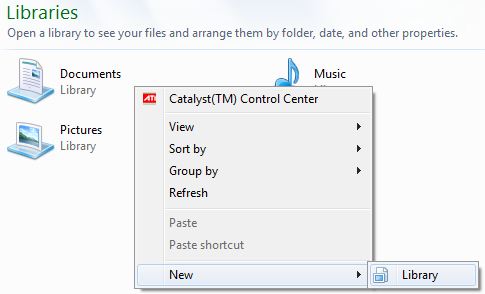
Or click the New Library button on the task bar of the Windows Explorer.
![]()
3) Give a name to your new Windows 7 library.
For example, I gave the name "Windows 7 Books" to the library I created as an example.
Note that when you give the name to the libraries in Windows 7, it will be displayed in navigation pane by default.
By the way, Windows 7 library icons are very lovely, are not they?

By displaying the context menu, you can prefer configuring the Windows 7 Library not to be shown in navigation pane.
Just choose "Don't show in navigation pane" menu selection to hide the Windows7 Library on the left navigation pane.

4) Double-click to open the new created Windows 7 Library.
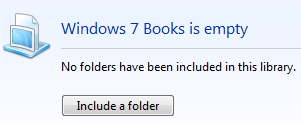
Since the Windows Library has just been created, no folders have been included in this library. So you should start linking file folders to Windows Library by pressing "Include a folder" button.
It is notable that Windows users can include up to 50 file folders into a single Windows 7 library.
After you include all the file folders you wish to see within in your new Windows 7 Library, you are end up with creating a library in Windows 7.
How to Restore Default Libraries ?
If you accidentially or on purpose delete default Windows 7 libraries like Documents, Music, Pictures or Videos you can restore back these libraries with a single click.
First click on the "Libraries" item on the left navigation pane.
Then display the context menu by right-click.
You should choose the "Restore default libraries" menu selection from the list.
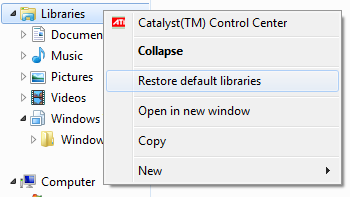
This action will restore deleted Windows libraries and links back to original status.
I hope you will find this Windows 7 libraries tutorial useful. Besides this Windows 7 libraries explained tutorial, Windows 7 users can find more official information about Windows 7 Libraries at Microsoft web pages.

